
WEMLB WiFi Hidden Camera Charger Adapter Instructions
- Jan 3, 2018
- 3 min read
Android and iOS Compiled setup video
To save paper and to also provide you with more dynamic contents, we put more advanced instructions on our Blog! Right here!
Basic Setting
Step 1: Download the app
Open your mobile phone and search for “BVCAM” in Apple Store (For IOS User) or Google Play (For Android User). Download the app. (As shown in Picture 01)

Step 2: Find the camera's WiFi signal
Turn on the camera (By Plugging the charger into outlet) and open the wifi setting on your phone. Check the back of the camera to see the wifi name of the camera (Show as Picture 2). Go back the Wi-Fi Setting. Select the camera’s wifi name to connect (Show as Picture 3)

Step 3: Connect the Camera to your device - Point to Point
When you finish connecting the camera’s wifi signal, open the app (“BVCAM”) that you download on step 1. Wait until the Hidden camera wifi's signal is shows on your phone. Then click SEARCH ICON to search the camera and click the camera (As shown in Picture 04, 05, 06)

Step 4: Change the default password
After Step 3, click Online Camera (Show as Picture 7). You can skip it or change or set the password. If you choose to change the password, click “Change”. Then you can enter your new password and click “OK” to finish (As shown in Picture 08)

StartFragment
Step 5: Connect the camera with Your home Wifi - Router Mode
Click SETTING ICON to set the wifi connection (As shown in Picture 9). ---> Click “Device Settings” (As shown in picture 10) ---> Then click "WiFi Config" (As shown in Picture 11).

Then choose your home WiFi's SSID (Name) and enter the related password ( as shown in Picture 12).

Then the camera will reboot and your device will be connected to your home WiFi not to the Camera WiFi Signal and your camera will be still Online (As shown in picture 13). You can also disconnect the wifi and use your Cellular Signal to connect the Cam.
Please Note: Most routers have 2.4G and 5G wifi to select. THIS CAMERA ONLY SUPPORTS 2.4G WIFI. Please select 2.4G wifi to connect. And during the setup, your phone need connect the same wifi as the camera.
Step 6: Check Live Video
After Step 5, it shows as Picture 14. You can click the Cam to see the Live Video (Show as Picture 15). When you click the video, it shows as Picture 16.

EndFragment
Step 7:
You can click CAMERA ICON to take a photo and VIDEO ICON to record. Click the 1080P to change the resolution (Show as Picture 16). When you finish taking a photo and recording a video, you can see the image and play the video on the app. Click “Snapshot” to see the images. Click “Record” to see the videos (Show as Picture 17)


Congratulations! You just make the Camera ’ALIVE’! Now it’s time to discover more advanced functions of the camera
Motion Detection Setting
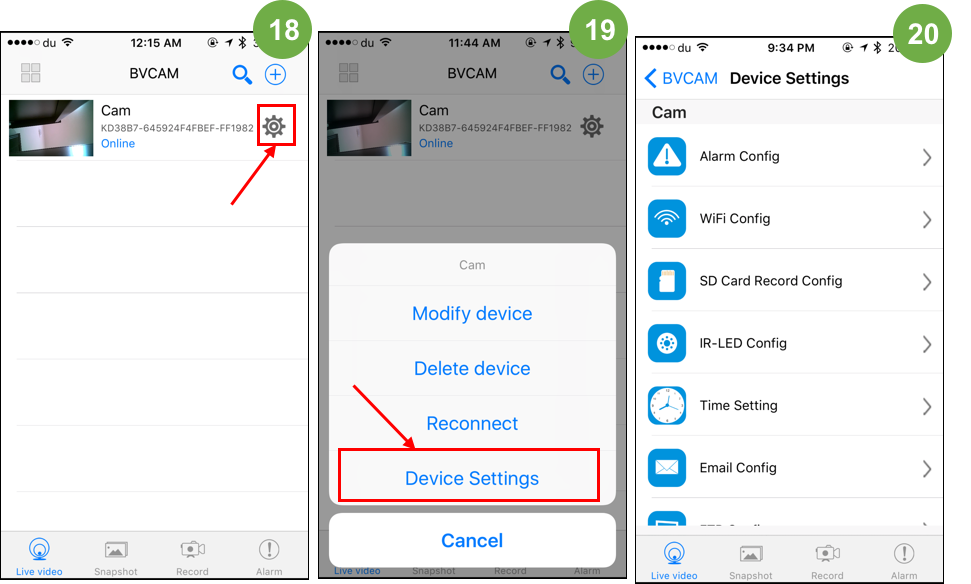
Step 1: Click SETTING ICON (Show as Picture 18) and then click “Device Settings” (Show as Picture 19) to enter the setting interface (Show as Picture 20).
Step 2: Enter the “Device Settings” interface, click “Alarm Config” then it shows like Picture 21. Click “Motion detection sensitivity” to select the sensitivity you prefer (Show as Picture 22). Turn on “Push Notification” and “On-Screen Display” (Show as Picture 23), then you can receive the image notification. You can Click ALARM ICON to see the image (Show as Picture 23).

Other Functions
StartFragmentThere are many other setting functions except ”Alarm Config” and “Email Config” (Show as Picture 26,27 )

WiFi Config
You can change the network you want to connect. (Show as Picture 28)
IR-LED Config
You can control the settings of the LED on this interface. There are three options, which are Close, Auto, and Schedule. Choose one option based on your requirements. (Show as Picture 29)

SD Card Record Config
You can change the SD Card Record Settings on this interface. (Show as Picture 30, 31). Click “Ok” after you make changes of the setting.

The options you can choose for “Record” and “Resolution” are show as Picture 32 and 33.

Time Setting
Select the date, time mode, and time zone one by one or you can just click “Sync With App Time” (Show as Picture 34, 35)

Misc Settings
You can use this interface to make change of the Work LED. And the work mode of this LED are Off, On, and Flicker (Show as Picture 36, 37).

Change Password
You can set up new password on this interface (Show as Picture 38 ).
Device Reboot
You can reboot your camera by clicking it (Show as Picture 39)

EndFragment
Please feel free to contact us through support@wemlb.com. We will revert in 24 hours.
Hope you are enjoying our product and service!

![[Android] WEMLB Hidden Camera quick setup for android users](https://static.wixstatic.com/media/8ddf7a_55f4f7ee7fba499088b4078367bb1a9d~mv2.png/v1/fill/w_126,h_129,fp_0.50_0.50,lg_1,q_35,blur_30,enc_avif,quality_auto/8ddf7a_55f4f7ee7fba499088b4078367bb1a9d~mv2.png)
![[Android] WEMLB Hidden Camera quick setup for android users](https://static.wixstatic.com/media/8ddf7a_55f4f7ee7fba499088b4078367bb1a9d~mv2.png/v1/fill/w_126,h_129,fp_0.50_0.50,lg_1,q_95,enc_avif,quality_auto/8ddf7a_55f4f7ee7fba499088b4078367bb1a9d~mv2.png)


![[Android] WEMLB Hidden Camera quick setup for android users](https://static.wixstatic.com/media/8ddf7a_55f4f7ee7fba499088b4078367bb1a9d~mv2.png/v1/fill/w_125,h_129,fp_0.50_0.50,lg_1,q_35,blur_30,enc_avif,quality_auto/8ddf7a_55f4f7ee7fba499088b4078367bb1a9d~mv2.png)
![[Android] WEMLB Hidden Camera quick setup for android users](https://static.wixstatic.com/media/8ddf7a_55f4f7ee7fba499088b4078367bb1a9d~mv2.png/v1/fill/w_125,h_129,fp_0.50_0.50,lg_1,q_95,enc_avif,quality_auto/8ddf7a_55f4f7ee7fba499088b4078367bb1a9d~mv2.png)


Comments